The holy grail - English AV buttons for the E52!
After a few months of driving my Elgrand E52 the one thing that has bugged me whenever I am driving at night is the lack of real English AV control buttons. I believe we all do the same in our Elgrands, buying the English vinyl stickers and applying them over the top of the Japanese text. It doesn't look perfect but its very very cheap and now I can understand what button I need to press. The downside is when driving at night the illumination of the buttons is now restricted by the sticker on top, making it impossible to read the text and making the button look like they have gibberish instead.
Fortunately those clever people over at Xanavi can now produce an set of buttons with English text . I have no idea how they do it, whether they are manufacturing them or using a 3D printer perhaps, but it is a brilliant solution.
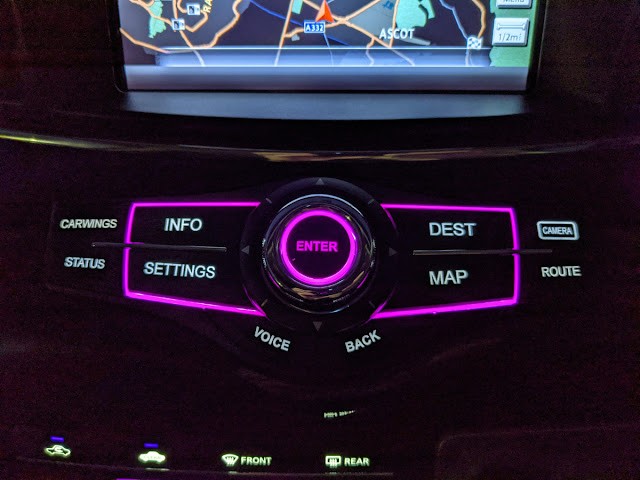
The end result is superb with fully lit buttons in English, the plastic is colour matched to the existing controls so they don't look odd as well. (The pink in the above picture is my car, don't worry Xanavi doesn't send them in pink!). Its not a cheap option but its very worthwhile I reckon, and makes the car look less of an import bodge.
I took a lot of pictures as I fitted the controls, so hopefully the below will help you if you are doing the same, or if you just need to get to the same parts for other reasons.
Howto: Disassemble the E52 to expose the AV/Aircon controls
1. First thing to do is to remove the gearshift know. I have already put a post about this HERE
2. Remove left panel in the passenger footwell. Simply pull the panel off from the central section and it should pop off.


4. Remove the DVD surround panel from the central section. There are 2 pop rivets each side at the rear of the plastic. Pull up the central part of the rivet and then you can lever the base of the rivet out. Once the rivets are removed the panel can be pulled towards the seats to remove. (NOTE: You might need to remove the carpets as they can be quite thick and hinders the removal.)

5. Remove the plastic cover panel by the drivers door. I would recommend you use plastic car tools for this to avoid damaging the plastics. You should be able to lever from from the front edge and then once opened up can be removed.

6. Remove the drivers drawer and release pulls. Open the drawer then pull it towards you to release the clips. Then unbolt the two nuts holding the bonnet and petrol cover release levers. Once unbolted pull them towards you to remove from the plastic panel, you can leave these hanging there.

7. Now its a big one. The panel below the steering wheel can now be uncliped and pulled away from the car. The edge near the door is easiest to unclip, nearer the centre it will be harder and you just need to work at it to get the clips out. Once its unclipped you should be ok to leave it hanging there as it has various wires still attached.


8. Now you can get at the triangle panel holding the start/stop button and lever that out. Do use the plastic tools to make sure you do not damage the panels as they are nice and shiny here. Again it just unclips and just leave it loose.


10. Now lets work on the passenger side of the unit. First thing is to remove the plastic cover panel. Use your plastic tools to lever it off and them remove.

11. Take out the screw holding the left hand shiny panel in place and then you can lever that out and remove.


12. Next remove the screw on the left hand side holding the AV control panel in place.

13. We are finally able to remove the AV panel itself. You need to lever it out, checking the bottom edge as there are 3 loops that are held by the panel underneath. You may need to pull the panel below (with the 100V & heated seat buttons) forward so that the loops can be pulled out.


I haven't written any assembly instructions, but the above steps should be easy to complete in reverse.
Hi Gary, another great post. Can you help with the purchase of the "plastic car panel removal tools" please? Where did you get them from, and what kind of price am I looking at please? Cheers, Martin.
ReplyDeleteThis is the kind of thing I purchased:
Deletehttps://amazon.co.uk/dp/B08PCP9PTC?ref_=cm_sw_r_cp_ud_dp_QRRBSEZ2RSVB0J47P0PJ