Lockwood MPH Dials for Nissan Elgrand E52
In the UK we still use miles instead of kilometers, so I needed to convert my Elgrand to MPH. I decided to fit the Lockwood dials instead of a chip as I had seen reports that the chips can fail causing problems.
Hopefully the information and pictures below will help someone with theirs. Removing all of the panels in the car is relatively easy, the only fiddly bit I found was the needle removal from the instrument cluster. The fuel and temp needles split apart so I had to use a tiny dab of glue to put them back together. I would also recommend you get yourself a set of plastic car trim tools to lever things out and pop clips, and avoiding the use of screwdrivers.
First thing, give the Lockwood page here a read before you start:
Lastly, before you start you should take pictures of the dials on where the needles are when they are at rest, and started (i.e fuel needle should show the same before and after).
Anyway, here we go:
1. Remove the triangular end panels from the dashboard. Just inside the two front doors, they just lever and pop out.


2. Next remove the left and right side panels from the floor level section. These are in the passenger and driver footwells either side of the cigarette lighter socket piece. They both come off by hand as they are held by a few clips.
3. Now remove the floor section cigarette lighter panel. There are 2 black pop rivet style fasteners either side, just pop these out and the whole section will then easily come away. The power unclips from the back of the power socket so that you can remove the whole thing.
3. Now remove the floor section cigarette lighter panel. There are 2 black pop rivet style fasteners either side, just pop these out and the whole section will then easily come away. The power unclips from the back of the power socket so that you can remove the whole thing.


4. Unbolt the fuel flap and bonnet pull lever section. After the two bolts are out the small section slides out to hang loose.

5. Now for a big section, the panel under the steering wheel which includes the main switch section where the electric doors etc are located. You need to pull gently across different areas to pull the clips out and once it starts coming off it should be easy to get the other side away as well. Don't bother unplugging cables it should just hang there for now.


6. Remove the small panel with the Ignition start/stop button on it. If you have the plastic tools you should be able to lever the clips out without damaging the nice shiny plastics. Again just let it hang loose, don't disconnect any cables.

7. Take out the small trim to the right of the steering wheel, very quick and easy to lever out.

8. Now the surrounding edge to the instrument cluster can be removed. For me it seemed to pull straight off with a little bit of effort. It should come away no problem, and there are two cables to disconnect either side.

9. Now you have the instruments avalaible to remove. Its just three screws (top, bottom left and bottom right) and you can lift it straight out. Unplug the two cables from the back so that it can be removed entirely from the car.


10. You should now take the cluster indoors to a clean area as it it now takes a bit of time and its quite delicate.
11. You need to take the plastic window off the front of the unit. This is held in place by the dark plastic clips onto the white plastic centre. (I managed to break two of the clips as it is very tightly held on, but as there are so many clips on it it didn't seem to be an issue when I put it back together.)

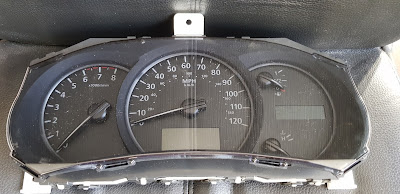
12. The dials are now exposed, you have to unscrew the 6 silver screws and remove the clear plastic dial fascia.

13. Now the worst bit. You have to remove the needles. WARNING Before you do this I suggest you read the Lockwood page about this (without step pegs) and follow those. Essentially you need to make sure the dials are all at their stop places, then you pull the needle up and anti clockwise as you do it to remove. The speed and RPM needles came away easy for me. The Fuel and Temp ones seem to have an extra plastic lip on them which stops them coming off as easy, and it caused part of the bottom of the needle to break off. I used a TINY (TINY!!) amount of superglue inside the black housing to hold the clear inside part securely, and a tiny dab to put the black bottom ring back on. (Lockwood state that you should not use superglue at all here, hence why I only used a tiny dab and I left the parts to dry for several hours before attempting to reassemble).
I have also heard from another Elgrand owner who recommended using spoons to lever the needles off. You use a pair of spoons with one either side and gently lever the spoons to push the needle off the peg evenly.


14. Now you can remove the black rings for the needle holes, peel off the current strip and replace with the new Lockwood one. There is no sticky on the Lookwoood but it is held in place by other elements so I didn't worry about that.
15. Putting the needles back on you have to push them on further round than the stop position and then you can push them round to the stop positions (check your pictures if in doubt). For example the speed typically rests on 0, so you fit it back at perhaps 30 and then move it back anti-clockwise to 0, for temp and fuel they move clockwise to rest positions.
16. Now you can put the clear plastic back on with the screws and the window section to reassemble the cluster.

You are now ready to reverse the steps above to put your car back together. Lockwood suggest that you try the dials out before you fully reassemble your car, so get the dials back in the car, start the engine to make sure that the RPM looks right, that the fuel moves to show the right fuel level. If they are not quite right you can take the dials out and move the needles slightly against their rest positions, but if they are too far that way then you would need to remove the needle and put it back on further round.
Most of the steps above are easily reversed to get your car ready for use again, the only thing I noticed is the panel under the steering wheel has a tube (aircon I assume) which attaches to the panel. Mine came off and I hadn't realised initially, so check that and push it back on if needed.
Good luck with it!
Comments
Post a Comment